Chapter 5[]
Visit all town events and grab all the quests available. Red Faction +1 will be awarded as soon as you interact with Yoruma as that is required to open up Alicia's shop.
Head to the Kadora mines B1, loot the new chest on the right. If you have Cowra's dungeon function unlocked, take the elevator to B6. From here, grab the two chests in the center of the room, then head to the stairs going down in the northwest part of the map (That direction is towards Orvuido's Palace) to loot the chests that were not obtainable (Also, if you haven't looted the chests from 春陽峠 for the same reasons, you should). When done, exit back to the town, and repeat town events (H-Scene with Rakuche & Niu). If you have already spoken to Saria once in the Inn, do not speak to her again. We will do this later. After speaking to Alicia in the inn, there will be a new quest for her. When completed, the shop officially opens, as well as her portrait will be unlocked: Ability to be able to purchase goods from her shop. Additionally, Shuri's Improve Room Function can now be trained under her portrait.
When all town events are completed, take the teleporter down to B6, and loot the chest in the hallway behind the Mirror where you went into save Revia. Then head down to B7 as the other set of stairs leading upwards leads to an area that is current inaccessible until Chapter 9.
カドラ廃坑跡B7F Kadora Mines B7[]
Once you reach to B7, head up to speak to Revia. Once the event is over, head into the long hallway. The most important here is not let Revia step onto any traps. In order to do this, the proper
puzzles (Not all) need to be solved to deactivate the trap. By doing this, we will avoid Revia's rape scene. If you want to witness it, simply just move up with Revia and step onto one or more of the traps in the hallway and then go back and solve the puzzles. This playthrough will solve all puzzles and avoid all the traps.
First Puzzle
Refer to the screenshot on the right and hit the buttons in the order that is specified regardless of the color changes. This will deactivate the trap.

First, go to the switch and hit it once to reset it. Refer to the screenshot on the left and hit the buttons in the order that is specified regardless of the color changes. This will unlock the chest.

Puzzle 2
The objective is to deactivate the trap first, by solving the third puzzle. This will show how to get to the second puzzle.

Second Puzzle. The third picture requires moving around a few times from one side to another.


Third puzzle: This one is easy.
First Puzzle: The first puzzle is actually the last puzzle to solve:


Once the puzzle has been solved, move up and at the end of the hallway where it is separated by a light blue line, be prepared for a boss fight.
Boss: Kachua (Celica's Level Cap is 80)
The fight is actually difficult because of her insane evade rate as she is probably one of the enemies that have the highest avoid rate in the game for some unknown reason. Additionally, this is also the first boss with exceptionally high frequency values, which makes both her defense and attack very strong. The hardest part of the fight is the beginning of the fight as her soldiers are deadly with their normal attacks. Have Celica and Valefor take them out with their AOE abilities; put Cowra as support in the beginning till the small units are all wiped out. Liliem is full time on boss with her Magic. Magic attacks seem to work much better than physical attacks against Kachua regardless of high overall defense in both departments. This means that Celica might be better off as a full time caster in this fight. Kachua's abilities are as follows:

- 8 second cast / 12 second delay 1x1 Darkness Magic Attack.
- 10 second cast / 5 second delay 1x3 Physical Attack.
- 4 second cast / 3 second delay 1x3 Physical Attack.
- 11 second cast / 4 second delay 1x1 Physical Attack.
- 17 second cast / 20 second delay 2x3 Magical Attack.
- 5 second / 4 second delay: Self Physical and Magical Defense 3 buff for 200 seconds.
Once she is defeated, her portrait will be unlocked: +3 to level cap. Move up and solve the last puzzle. Puzzle 3 is rather straight forward and also very hard to show on the map. When this is done, head out of the room and you will see Revia coming towards you like how she did with the other two trap rooms. Head back to the town.
Proceed with the town events, and again don't speak to Saria in the Inn. There will be an H-scene event with Valefor in the Inn. When all events are completed, head back to B7 and move past the long hallway. There will be a Goddess Bar recovery point. Further ahead, you will see Latina. When ready, head up to her and there will be two consecutive boss battles.
Boss Battle 1 - Latina: She will have 3 ghosts that should be taken out quickly as they have an AOE Charm, if successful, the player will be charmed for 20 seconds. All of Latina's abilities remains unchanged and the fight is also identical to the one in Chapter 1. Do not hesitate to spend all your MP/TP on offensive abilities here. Shuri can also participate in the attacks her with her Holy weapon as it deals 200% damage against Latina. This fight is an easy fight as nothing is changed.
Boss Battle 2 - Dark Magician: He's unbeatable unless it's NG+ with items carried over. The objective here is to outlast the battle for 300 seconds before the Goddess bar depletes to 0. If the bar reaches 0, it results in a game over. Everyone of his attacks that hit Celica will deplete his Goddess bar. The easiest way to handle this fight is simply just have the boss knock out Celica as the bar will not be depleted when his HP is 0. Overall these two fights are a lot easier than Kachua.
- 8 second cast / 6 second delay: 2x1 Physical Attack
- 17 second cast / 22 second delay: 5x2 Darkness Magic Attack that causes the Acid Debuff (Drains 68 Goddess Bar)
After the battle is over, there will be a series of events and Celica will end up back in town.
火竜の山 Firedrake Mountain[]
Roka requested Celica to help her to subjugate a Demon that is reachable from B1 of the Kadora mines, and she now joins your party. Her portrait is unlocked: Reduce 1 Goddess consumption


per battle. We will head over there later.
Proceed with the town events, and Cowra requested Celica's assistance to kill a Fire Drake in the Fire Volcano. There will also be a H-scene with Kun (Might be later or earlier in the Chapter. Must have completed her friendship quest: 薬草の採取). Also, a new quest for Alicia will be available (Maybe later if you haven't talked to her enough: 目玉商品の開発. It simply requires 幸運の妙薬, a very common item that can be dropped or crafted.) Completing this quest opens up the events that lead to her H-scene later in the Chapter. Again, do not speak to Saria. When all town events are done, head to the Firedrake Mountain.
This dungeon is rather small. The only thing we need to be aware of is that once you reach certain specified spots (Forward or backwards), a drake will be coming, and you have a choice to whether or not to hide from it. After the quick dialogue ends, you have 4 seconds to do so. A successful hide results hiding inside the cave or anywhere that contains a roof; whereas an unsuccessful one triggers a battle that you need to outlast for 200 seconds. Hold down the ctrl key to move faster. The monster at its current stage is simply unbeatable unless it's NG+ with carried items at the minimum. These encounters will permanently disappear when the boss is defeated.
The map shows the spots where the drake is coming and the safe spots. The area just before the chest on the bottom is where the boss is located.
There is also a lot of Monster Stones that can be obtained in this map, so random encounters can be spammed at the recovery point located in the room on the lowest blue circle.
Boss: Faiadoragon (Fire Dragon) - Celica's Level cap 83
This boss is actually pretty easy regardless of his stats being somewhat similar to Kachua. Fire Armor is helpful, but it is completely not necessary at all. If he constantly uses his 6 second 3x3 Dragon Wipe ability, then it can be painful, but if he decides to cast his 29 second ability once, he's going to take a lot of damage in between. Make sure Liliem is here as her Frost attacks are simply very effective.

- 2 second / 2 second delay: 5x5 FS reduction roar. It also has a chance to apply the Horror 2 (FS reduction over time) effect for 100 seconds. Seems to always cast this ability in his first attack.
- 29 second cast / 8 second delay: 5x5 Fire Attack. It also has a chance to apply the Burnt 2 (Damage over time) effect for 100 seconds.
- 18 second delay / 5 second delay: 1x1 physical attack.
- 6 second cast / 3 second delay: 3x3 Physical Attack.
When the Fire Dragon is defeated, there will be a H-scene with Cowra and when the event is over, you will be back in the town. Proceed with town events and don't speak to Saria yet. Grab the new quest: 火竜の山 from the Bulletin board. the Firedrake mountain needs to be revisited to loot the chest that the boss was guardian as well as completing the new quest that was just picked up. Watch out for the monsters from quest 火竜の山 as they love to do 5x5 Fire Damage ability though it takes 20+ seconds to cast. They are fire element as well. When done, head back to the town and proceed with town events except for Saria. The H-scene for Alicia should be available.
エルモンの宮 Roka's Request - Erumon Palace[]
Once the above events are completed, head to Kadora Mines B1 and move to the barrier on the left. Roka will dispel it, and the inner areas can be explored.
Loot all the chests and there will be a switch upstairs where you can move the switch to '中央' or '左'. Move 左 first, so the chest can be grabbed. When done, head back to the switch and move it 中央 and head down to B2. In B2, there is a colored door leading to a portal. This area is blocked until Chapter 7. Simply head down to B3.

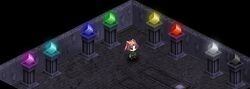
When in B3, there are two chests that is being blocked by a yellow door (NG+ and after defeating a certain end boss only). Head to the southeast room and fight a mandatory battle. When completed, there will be a gem that constantly changes colors, but always in the same pattern. Head to the Northeast room and there will be a lot of switches. The puzzle works like this: Each room can provide you the color of the two gems, or the color of one gem, or no colors at all. However, only one color of each can be used. So by examining all four rooms, 5 of the 8 colors have already been laid out. There are two ways to figure out the other 3: Trial and Error, or look at the gem that constantly changes color as the order is always the same.
The solution from left to right: From left to right: Violet (紫), Light Blue (水), Blue (青), Green (緑), Yellow (黄), Red (赤), White (白) and Black (黒) as shown on the right.
Once all chests are looted head to B4 and there will be a recovery point. The boss is located in the north of the middle section. Boss: Erumon - Celica's level cap is 83.
Erumon is a Fire Element Demon, but if you were to compare his other two companions, he is by far the easiest of the three. This boss fight is easy and requires no special setup. His cast times are long and generally do not hit for a lot. He can possibly be the easiest boss in this Chapter so far. His abilities are as follows:

- 22 second cast / 6 second delay: 3x3 Physical attack.
- 12 second cast / 18 second delay: 5x5 Fire Attack that has a chance to trigger Burn 2 for 100 seconds.
- 10 second cast / 8 second delay: 1x1 Physical Attack.
- 8 second cast / 4 second delay: 3x1 Physical Attack.
After Erumon's defeat, his portrait will be unlocked: +3 to level cap and a book of Advanced Level Demon is obtained. After seeing the events, there will be a H-scene for Roka. Celica will be back to the town. Complete all town events (H-scene for Roka) except for Saria. We will need to head back in here and loot the two chests behind Erumon. If you spoke to the Guard in Revia's post, you will see an event where she is in trouble when entering the Kadora mines.
Note: Now that all three demons are defeated, the dungeon: 瑠璃の座閣 can be accessed through the teleporter from Kadora Mine B7. However, it will be revisited in the later chapters.
Rescuing Saria (Mandatory)[]
Defeating Rudon is a mandatory requirement for Abeloo's ending.
When all town events are seen, finally go speak to Saria. She will be kidnapped by Rudon and you are unable to access to any dungeons. She is located in the Musk's Warehouse in the town. Once inside the warehouse, break the box in the Northwest for a stone and head to the standalone shelf for a hidden passage that leads downstairs. Loot all the chests and fight all the mandatory battles. Rudon is located at the deepest part of the floor. Enemies are generally not hard at this stage of the Chapter.
Boss: Rudon - Celica's Level cap 86
Rudon, like Kachua, is one of the harder fights in this Chapter, which is why it was delayed. It's also possible to do this event in Chapter 6, but it's manageable as better equipment was obtained. Rudon is just as annoying as Kachua, but in a different, yet dangerous way. His counter attack (12% chance) is extremely annoying as it can do a lot of damage to characters with low defense, and he can perform this even when an attack is missed. He can also heal for 50-60% of his health with a 4 second cast time, but it's not that big of a deal. His TP attacks are generally very strong. Have Liliem/Cowra and Shuri act as a support while Valefor use her 3x3 Attack, Roka use her 2x2 attack, and Celica use his 5x2 attack in the beginning to completely wipe out all the enemies. Then proceed to take care of Rudon. Make sure the attack frequency accessories are equipped for the three Physical attackers as it will make a big difference. His abilities are below:

- 1 second cast / 10 second delay: Self Buff Attack 5 & Attack Frequency 4 for 200 seconds
- 20 second cast / 6 second delay: 3x3 Physical Attack
- 8 second cast / 5 second delay: 1x1 Physical attack
- 5 second cast / 6 second delay: 1x1 Physical Attack
- 4 second cast / 3 second delay: Heals himself for 3000 HP
After Rudon's defeated, his portrait is unlocked, yielding more quests (Weapon/Armor Request) from the bulletin board. Visit all town events (Another H-scene for Roka) and the fighting quests will be completed now. List will be added in the Summary Chart section. Here, use the Ritual and change Celica's Goddess Bar to 200. Return to Town/Dungeon and repeat Saria's events until you see her H-Scene (Second one) and the follow up event after. This event, while not needed to be completed right now, but it is require for Chapter 9.
カドラ廃坑跡B8F Rescuing Revia[]
Make your way down to B7 and head past the long hallway where you engaged Latina/Magician. This area will now be free and not blocked by guards. Make sure the teleporter is unlocked.


Grab the chest and head to the right down to B8. There is a black barrier blocking the path on the left, which can be accessed in Chapter 7.
Upon entering B8, you noticed the escape tool is not usable. Proceed and you will be fighting Rewinia traitor solders. Moving forward, there will be a corpse blocking a path leading to two chests (Chapter 6). Ignore that and keep going. If you see Refin in the room on the picture shown on the right, then you will witness Revia's rape scene. Otherwise, her rape scenes will not be seen. Regardless, there will be a small event there.
Failing to do any of the below will result in viewing her rape scene, which leads to two more H-scenes later in the game:
- Defeat the Orcs in B2. This could be done as early in Chapter 1
- Her team engages 2 or more monsters in B4 during Chapter 2.
- Failure to deactivate any of the traps in B7 during Chapter 5.
Since I fulfilled all three requirements (Number 2: I left her engage 1 monster), her rape scene will not be witnessed. Move further ahead and activate the teleporter and a recovery point will be seen. Two consecutive boss battle will be in the room ahead.
End Chapter Boss: Celica's Level Cap 86. Note: His attack power is much higher, but defense is much lower due to lore reason.
Boss Battle 1: Sagamoa
Sagamoa attacks are not only very strong, but they are extremely fast. It's not uncommon to see him killing one of your party members in seconds. However, his defense is really weak. There are two ways to defeat him and either works:
- Kill the guards first,
- Simply kill him as fast as you can.
With the right setup and current levels, the second method is much easier to perform, as Valefor, Celica and Roka can do significant damage as their abilities are also rather fast to cast. But this method can also pose good amount of risk if the guards simply focus fire on a character as they are almost guaranteed to die. If the first method is used, Celica should be able to clean the guards up for the most part with a single normal attack as the guards do not revive at all. I personally chose #2. Sagamoa's abilities are listed below:

- 6 second cast / 3 second delay: 1x1 Physical attack
- 4 second cast / 3 second delay: 1x3 Physical Attack
- 10 second cast / 4 second delay: 1x1 Physical Attack
- 13 second cast / 8 second delay: 1x3 Physical Attack
- 1 second cast / 10 second delay: Self Attack Buff 5 and Attack Frequency 4
Boss Battle 2: Ranzabu
Ranzabu isn't really difficult himself; he is just annoying. Again, the same two strategies for Sagamoa can be used here. Celica and Valefor can do a lot of damage to Ranzabu; have Roka focus on the guards as a distraction. However, if Celica can 1 shot the guards with his normal attacks, then having him do that also works so the majority of the damage can be completely mitigated. This way, it forces Ranzabu completely on the defensive side, and it's a matter of time before he drops. Either strategy is effective. I personally chose #2. Ranzabu's abilities are listed below:

- 5 second cast / 8 second delay: Summons new Guards, maximum of 3.
- 8 second cast / 6 second delay: Evade 1, Physical Defense 1, Magical Defense 1 for 200 seconds for the entire party
- 8 second cast / 3 second delay: 1x1 Physical Attack
- 4 second cast / 3 second delay: Self Heal 1000 HP. This is often used when low on health.
After Ranzabu, his portrait will be unlocked granting +3 to level cap. The chapter also ends.
Quest/Events Summary Chart[]
| Event/Quest Completed | Guild Faction Change |
|---|---|
| Rescue Saria | -3 Blue, +3 Neutral |
| 春陽峠 | - |
| 鬼族の生息地 | - |
| 火竜の山 | - |
| 開店準備の素材調達 | - |
| 目玉商品の開発 | - |
| Summary | 21 Red, 10 Neutral, 9 Blue |
End Chapter: Celica's Stats and Function[]
Taken right before Chapter 5 End Boss.


| La DEA of Libra (Detailed Walkthrough) | ||
|---|---|---|
| <<<Previous |
Part 1 Part 2 Part 3 Part 4 Part 5 Part 6 Part 7 Part 8 Part 9 Part 10 |
Next>>> |
| Stray Demons(Majin) | Extra Events(EX) | Version 2.0 | ||